General Support Queries
Extend NDMIS PreProd for ETL Runs
Use this runbook when NDMIS teams request that the legacy AWS PreProd environment and databases remain running outside their normal operating hours, usually for additional ETL runs.
Prerequisites
- Confirm the first and final dates the environment is required
- Confirm whether the request includes the night after the final named day
- Use the legacy Probation AWS login method. AWS SSO does not work for this account
- Log in to the
01058...AWS account with the administrator role
Create the calendar event
- Sign in to the AWS Management Console using the legacy Probation login
- Confirm that you are in the
01058...account and using the administrator role - Open AWS Systems Manager
- Select Change Calendar
- Open the
delius-pre-prod-calendarcalendar - Create a new calendar event
- Give the event a descriptive name, such as
Extended PreProd for ETL run - Set the event to begin at approximately 12:00 Europe/London on the first requested day. During BST, this is 12:00 UTC
- Set the event to end at 13:00 Europe/London on the day after the final requested night
- Save the event
For example, if PreProd must remain available on Tuesday night, create an event from Tuesday at 13:00 until Wednesday at 13:00. If it must remain available through Friday night, end the event on Saturday at 13:00
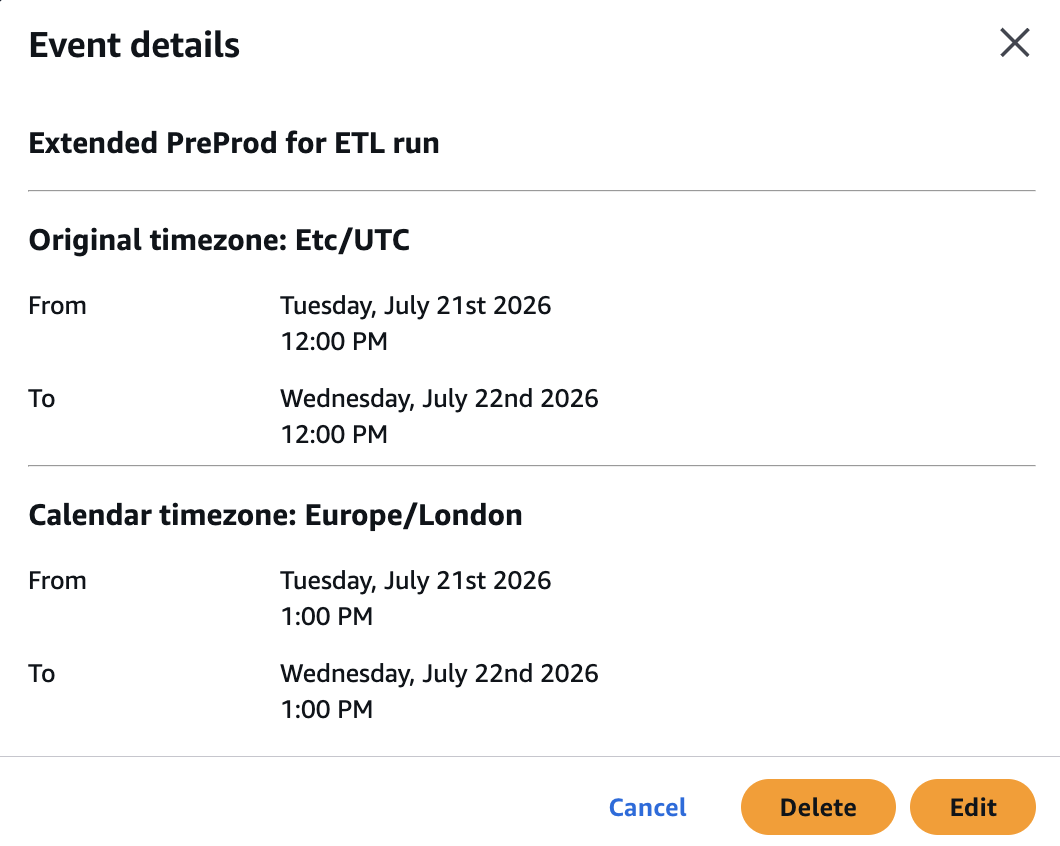
Important: Use the
Europe/Londoncalendar timezone and check the UTC conversion displayed by AWS. During BST, 13:00 Europe/London is 12:00 UTC. Account for GMT/BST clock changes when scheduling events.
Verify the change
- Reopen the
delius-pre-prod-calendarcalendar - Confirm that the event appears on the expected dates
- Check the event name, start time, end time and timezone
- Confirm that the event covers every requested overnight period
- Reply to the requester confirming that the extension has been added to the calendar
Change the NDMIS BO Banner Schedule
In the #ask-probation-hosting channel, we often receive requests from users asking us to change the schedule for the NDMIS BO Banner (for example, asking us to change the schedule from 5pm to 6pm) - in order to do this, you need to follow these steps:
- Access the relevant Delius AWS Account (for example, if you have been asked to update the NDMIS BO Banner for Production, access the Delius Prod AWS Account)
- Within AWS CodeBuild, find the relevant
delius-ENV-mis-lb-rule-mgmt-buildbuild project (for example, in Prod this would be:delius-prod-mis-lb-rule-mgmt-build) - Under “Project Details” you will find Environment Variables - this will contain a
STOP_TIMEvariable - edit the Environment configuration, and update theSTOP_TIMEvariable to the requested time (for example, if the existing value is17:00and the requested time is18:00, update as appropriate) - Under “Build Triggers” you will see a
delius-ENV-mis-lb-management-stop-event-ruletrigger, which will have an associated schedule expression - update this as appropriate (PLEASE NOTE: The schedule expression will be GMT, so if you were looking to set the schedule to18:00BST, set this to the corresponding GMT)
Once this is complete, respond to the user in Slack and inform them that the banner will be displayed at the intended time.
Recycling NOMIS Web Instances
Occasionally, we have a need to recycle NOMIS Web instances (for example, due to AWS Health notifications informing us that the underlying EC2 instance is due to maintenance - if you are on support, please ensure that you stay on top of email notifications)
These are the steps you would need to follow in order to successfully recycle a NOMIS Web Instance:
- Within the AWS console, stop the relevant instance(s) by selecting the instance, then selecting Instance State > Stop Instance
- Once AWS has stopped the instance, the autoscaling group will kick in and provision a new instance
- Please note: If you are recycling an instance within the
prod-nomis-web-bASG, the SHA for the user data is pinned - this is intentional, to ensure that any undesired changes within themainbranch are not released to Production - If you have a need to update the SHA/pull in more recent changes ahead of the recycle of a
prod-nomis-web-binstance, you can first test by provisioning an instance forprod-nomis-web-a - This uses the main branch, and primarily exists to give us the option for blue/green/parallel deployments. As such, it can be leveraged for testing purposes.
Assuming the instance provisions successfully, take a note of the most recent SHA commit, and update
prod-nomis-web-bto point to this as appropriate.
- Please note: If you are recycling an instance within the
- Once the new instance is running, connect to the AWS instance via SSM (for guidance on how to connect to an EC2 instance, see this page)
- Run
tail -f /var/log/messagesand follow the logs on the instance- This EC2 instance will run all of the ansible roles listed in server_type_nomis_web.yml
- One of the key roles here is the nomis-weblogic role - this is used to implement the required configuration for NOMIS (e.g. creating forms servers, installing nomis releases etc)
- It will usually take somewhere between 60 and 90 minutes for all of the relevant ansible tasks to complete running on the instance - keep an eye out for output similar to the following:
PLAY RECAP *********************************************************************
localhost : ok=352 changed=191 unreachable=0 failed=0 skipped=124 rescued=0 ignored=2

# Cleanup
ansible-ec2provision.sh end
post-ec2provision.sh start
# running: /usr/local/bin/autoscaling-lifecycle-ready-hook.sh
post-ec2provision.sh end

#############################################################
- Assuming this has completed as expected, you should then run
service weblogic-all statusto check the status of the weblogic services. All services should be reporting as OK and/or RUNNING- The weblogic-all init.d configuration can be found here - see also: weblogic-healthcheck
- You may also want to consider connecting to the NOMIS Client EC2 instance via Fleet Manager and ensuring that the application responds
- To do this, open internet explorer and access the following (replacing the URL paths/localhost values with the IP Address of your instance)
- NOMIS App URL
- NOMIS Admin Console (See the localhost value and update as appropriate)
- Whilst you don’t need to log into these services at this point, if you wish to do so, please contact another platform operations team member for guidance on where to obtain the relevant credentials (if you are unsure where they reside)
- At this point, you should reach out to the relevant DBAs for NOMIS to inform them that the instance recycle has completed successfully - provide them with the new Instance ID and IP Address, so that they can perform their relevant tests
- To do this, it is easiest to contact them via the
#shef_dbaslack channel
- To do this, it is easiest to contact them via the
Once the DBAs have completed their relevant testing, the activity can be considered complete.
Increasing Disk space
In the event that you receive an alarm for low disk space and need to resize, please see the EC2 free-disk-space-low alarm page as a first step, as this provides general guidance on where to check. Also, see how to free up diskspace in FixNGo, and how to increase database disk size in MOD Platform (please note that this guide is generally for Linux EC2 instances)
If you need to increase the disk space for a Windows instance (for example, the Jump Servers for Domain Services) please follow these steps:
- Make the relevant Terraform changes within the modernisation-platform-environments repository - see this PR as an example of the change you would need to make
- Once the PR has been merged, ensure that the change is Terraform applied via the relevant github actions workflow - then use the AWS console to check that the EBS volume has been updated
- Connect to the appropriate EC2 instance, and run
Get-PSDrive -PSProvider FileSystemto check the current used and free capacity for the instance - this will return something like:
Name           Used (GB)     Free (GB) Provider      Root                                                         CurrentLocation
----           ---------     --------- --------      ----                                                         ---------------
C                 181.02         18.98 FileSystem    C:\                                                         Windows\system32
- Run
Get-Disk- this should confirm that Windows sees the updated disk as per the EBS volume
Number Friendly Name     OperationalStatus  Size
------ -------------     -----------------  ----
0      NVMe Amazon EBS  Online             400 GB
- Then, run
Get-Partition -DiskNumber 0- you will most likely see from this output that, whilst Windows sees the full disk allocation, the partition you are looking for is still at its original value
Disk Number  PartitionNumber  DriveLetter  Size
-----------  ---------------  -----------  ----
0            1                C            200 GB
- Assuming you wish to extend the C: drive, check how large this can become by running
Get-PartitionSupportedSize -DriveLetter C- this will return something like:
SizeMin      SizeMax
-------      -------
209715200    429496729600
- Run the following commands to extend the relevant drive to the maximum value:
$size = (Get-PartitionSupportedSize -DriveLetter C).SizeMax
Resize-Partition -DriveLetter C -Size $size
- Run
Get-Volume -DriveLetter Cto verify that the change has taken effect (you can also re-runGet-PSDrive -PSProvider FileSystemto double check)
Check disk utilisation on a Windows instance
Before extending a disk for a Windows EC2 instance, it may be worth checking the current disk usage to see if there is any space that can be freed up. You can do this by running the following commands in PowerShell:
Get-PSDrive -PSProvider FileSystem- shows the overall used and free capacity- Then, run the following command to find the biggest folders within a relevant drive (in this example, we check the C: drive - note that this command may take a couple of minutes to fully execute)
Get-ChildItem C:\ -Directory -Force -ErrorAction SilentlyContinue |
    ForEach-Object {
        $size = (Get-ChildItem $_.FullName -File -Recurse -Force -ErrorAction SilentlyContinue |
                 Measure-Object Length -Sum).Sum
        [PSCustomObject]@{
            Folder = $_.FullName
            SizeGB = [math]::Round($size / 1GB, 2)
        }
    } |
    Sort-Object SizeGB -Descending |
    Select-Object -First 20
- This will return a list of folders in order of their size - you can then inspect each folder to see what files are taking up the most space, and whether any of them can be deleted or moved to free up disk space - for example:
Get-ChildItem "C:\Documents and Settings" -Directory -Force -ErrorAction SilentlyContinue |
    ForEach-Object {
        $size = (Get-ChildItem $_.FullName -File -Recurse -Force -ErrorAction SilentlyContinue |
                 Measure-Object Length -Sum).Sum
        [PSCustomObject]@{
            Folder = $_.FullName
            SizeGB = [math]::Round($size / 1GB, 2)
        }
    } |
    Sort-Object SizeGB -Descending